Docker is an application developed in Go language originally by the founder of dotCloud: Solomon Hykes.
Today the Git repository contains 8 450 commits, thanks to the 441 contributors, with the very first commit created on the 19th of January, 2013.
Docker versus Virtual machines
Nowaday, servers providers propose VPS or KVM, otherwise dedicated servers. Those VPS and KVM are, finally, an assembly of resources (CPU, RAM, …). This means, there are additional layers between the host system and your server where you’re going to install Ubuntu for instance.
This will consume additionnal resources. Docker avoid those layers, so will save you resources as Docker runs the containers in the host system. Then cgroup is used in order to limit the use of the resources to not impact the host system.
The only existing solution to do this is OpenVZ which is quite close to Docker.
Install Docker
Docker can be installed on all the platform thanks to the very new Boot2Docker.
But Docker is better on Linux as you don’t need anything else than Docker. On other systems you’ll have to install VirutalBox or VMware.
In order to install Docker, visit the Get Docker page and select the documentation for your operating system.
Prepare your app to be containerized
The idea of a container is to run it anywhere it is executed.
Let say you’re developing an application using a database, and for any reasons you have to change the address, port or username etc… You could modify the configuration file (database.yml for Rails for instance), then re-create the Docker image … but this will take so much time.
The other way is to use environment variables.
Have a look to an extract of the database.yml file from my brewformulas.org project:
As you can see, I can post a file which shouldn’t be posted usualy for security reason.
When I’m starting my container, I just have to give envrionment variables in order to get it working. I could even go futher and prepare a per database configuration so that with one environment variable I could switch from one database to another.
Containerize your app
In order to show you how to use Docker, I’m going to take my small app brewformulas.org (you can access the source code at Github).
Docker can be used in 2 different ways:
- Manually, where you have to create a new image and then apply modifications manually by executing the image and install packages or change configuration files. Then when it’s done, like Git, a commit with the modification will be generated.
- Automatically, which means to use a Dockerfile where you describe each modification you’d like to apply.
We go for the last one.
Expectations
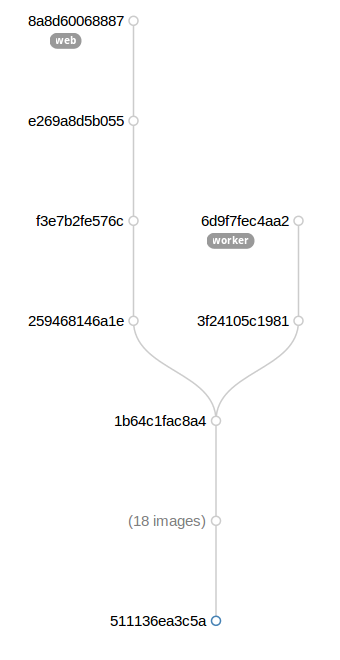
Before to start with the Docker image creation, let’s summarize what we’re going to achive:
- 1 main image
- 1 web application image
- 1 worker image
The main image will contain the source code and the dependences which are gems in this example.
The 2 other images will be a derived version, which will be differentiated by the use of tags. The web tagged will open the port 80 and start the application, while the worker tagged will only start the workers (sidekiq).
Here is a visual version (Generated by Quay.io):
Dockerfile
A Dockerfile is a file which describe which image has to be used as source, and then the list of modification to be applied.
This file has to be created in the root folder of your application, and then you only have to execute the build action from Docker in order to start the build of the image.
Here is the Dockerfile for brewformulas.org in order to build the main image:
The first instruction FROM define that I want to use the image, published on the index of Docker.io, litaio/ruby.
This image include the last Ubuntu version (14.04), plus the last Ruby version (2.1.2).
This is the way to choose an image. Look at the basic requirements for your case and search an image which cover them, like here latest Ruby version in my case.
The next instruction is MAINTAINER. This instruction is optional and has no impact on the image creation. It’s purely for information.
Then thanks to the RUN instruction, you can execute commands, which will be executed (and cached) only during the build of the image.
Here, from line 10 to 14, I’m ensuring to have an up-to-date system and to have git and wget installed (will be use after).
From the line 17 to 21 I’m using wget in order to install newrelic.
From the line 24 to 29 I’m creating the /application folder where I’m cloning, using git, the source code.
Last lines are executing Bundler in order to install all the required gems.
Build the main image
Now that our Dockerfile is ready, the last step is to execute the build Docker action passing the path of the Dockerfile (which is the current folder in this case):
1
sudo docker build zedtux/brewformulas.org .
Docker will download first the litaio/ruby image, then you’ll see each commands being executed.
When the build is done you can look at the image by typing the sudo docker images command:
Congratulations! You just created your first Docker image. :-)
Build the other images
Folders structure
In order to build the 2 other images (web and worker), you need 2 other Dockerfile.
We can’t just create them in the root folder due to the filename collision.
Here is a representation of the way I have achive it:
The Dockerfile for the main image is in the brewformulas.org/brewformulas.org path, while the 2 others are in a separated sub folder in the brewformulas.org/docker/ path.
Web tag Dockerfile
Here is the Dockerfile for the web tag image:
The FROM instruction refer to our main image which include the application source code and dependences.
The MAINTAINER remains the same.
Then, as we are creating the web image, we have to compile the Rails assets with the bundle exec rake assets:precompile command from line 12.
Before to start the application, we have to open the port 80 of the container using the EXPOSE instruction, and then define the RAILS_ENV environment variable to production from line 16 to 17.
Finally we have the ENTRYPOINT instruction which define what has to be executed when the image will be run.
I’m using it in order to first start newrelic, then ensure that all migration scripts have been executed and then the web application is started on port 80.
This means the first you’re going to start the container you will see in the log file the execution of the migration scripts. In the other hand, the next time you’ll run the container, it will directely start the web application.
As we want to create a tag of the main image we have to execute the docker build action as the following:
1
sudo docker build -t zedtux/brewformulas.org:web ../docker/web
The -t argument allow us to tag the image.
The Dockerfile path, which was a dot for the main image, is now the path to the sub folders ../docker/web where the web Dockerfile is.
It is also possible to use an URL instead of the file path. For instance you can use a Git URL.
Worker tag Dockerfile
The principle is exactly the same so I’m not expalining again :-)
Here is the Dockerfile:
We only start newrelic and then sidekiq.
In order to build the image, execute the following:
1
sudo docker build -t zedtux/brewformulas.org:worker ../docker/worker
Result
Then you should have the following result:
Newrelic configuration
Maybe you’re wondering how I’m configuring the license key as nowhere I’m editing the newrelic configuration file.
After a short analysis of the init.d script, I have found that an environement variable is checked which is NEW_RELIC_LICENSE_KEY.
When it is defined, the init.d script update the newrelic configuration file itself and then start.
This way I can publish my Dockerfile without exposing my license key.
Conclusion
As you’ve seen, it’s really easy after having practiced once and having understood the way the Dockerfile are working.
I’m inviting you to visit the Dockerfile documentation as I have only introduced the basic and minimal instructions.